> ## Documentation Index
> Fetch the complete documentation index at: https://docs.usekafka.com/llms.txt
> Use this file to discover all available pages before exploring further.
# Quickstart
# Creating Your First AI Employee with Kafka
This quickstart will walk you through creating your first AI Employee using Kafka's core features. By the end, you'll understand how to set up Workflows, Playbooks, Integrations, and Tools to power your employee.
## Step 1: Choose Your AI Employee Template
An AI Employee that manages your inbox, calendar, and communications.
**You'll learn to build:**
* Daily email summary with phone call workflow (9am trigger)
* Professional email formatting playbook
* Gmail and Google Calendar integrations
An AI Employee that finds candidates and tracks your recruiting pipeline.
**You'll learn to build:**
* Daily candidate outreach workflow (10am trigger)
* Recruiting pipeline update playbook
* Apollo and Greenhouse integrations
An AI Employee that syncs tasks and coordinates team work.
**You'll learn to build:**
* Daily Slack-to-task sync workflow (5pm trigger)
* Add task to ClickUp playbook
* Slack and ClickUp/Linear integrations
Expand one of these templates to see role-specific examples throughout this guide.
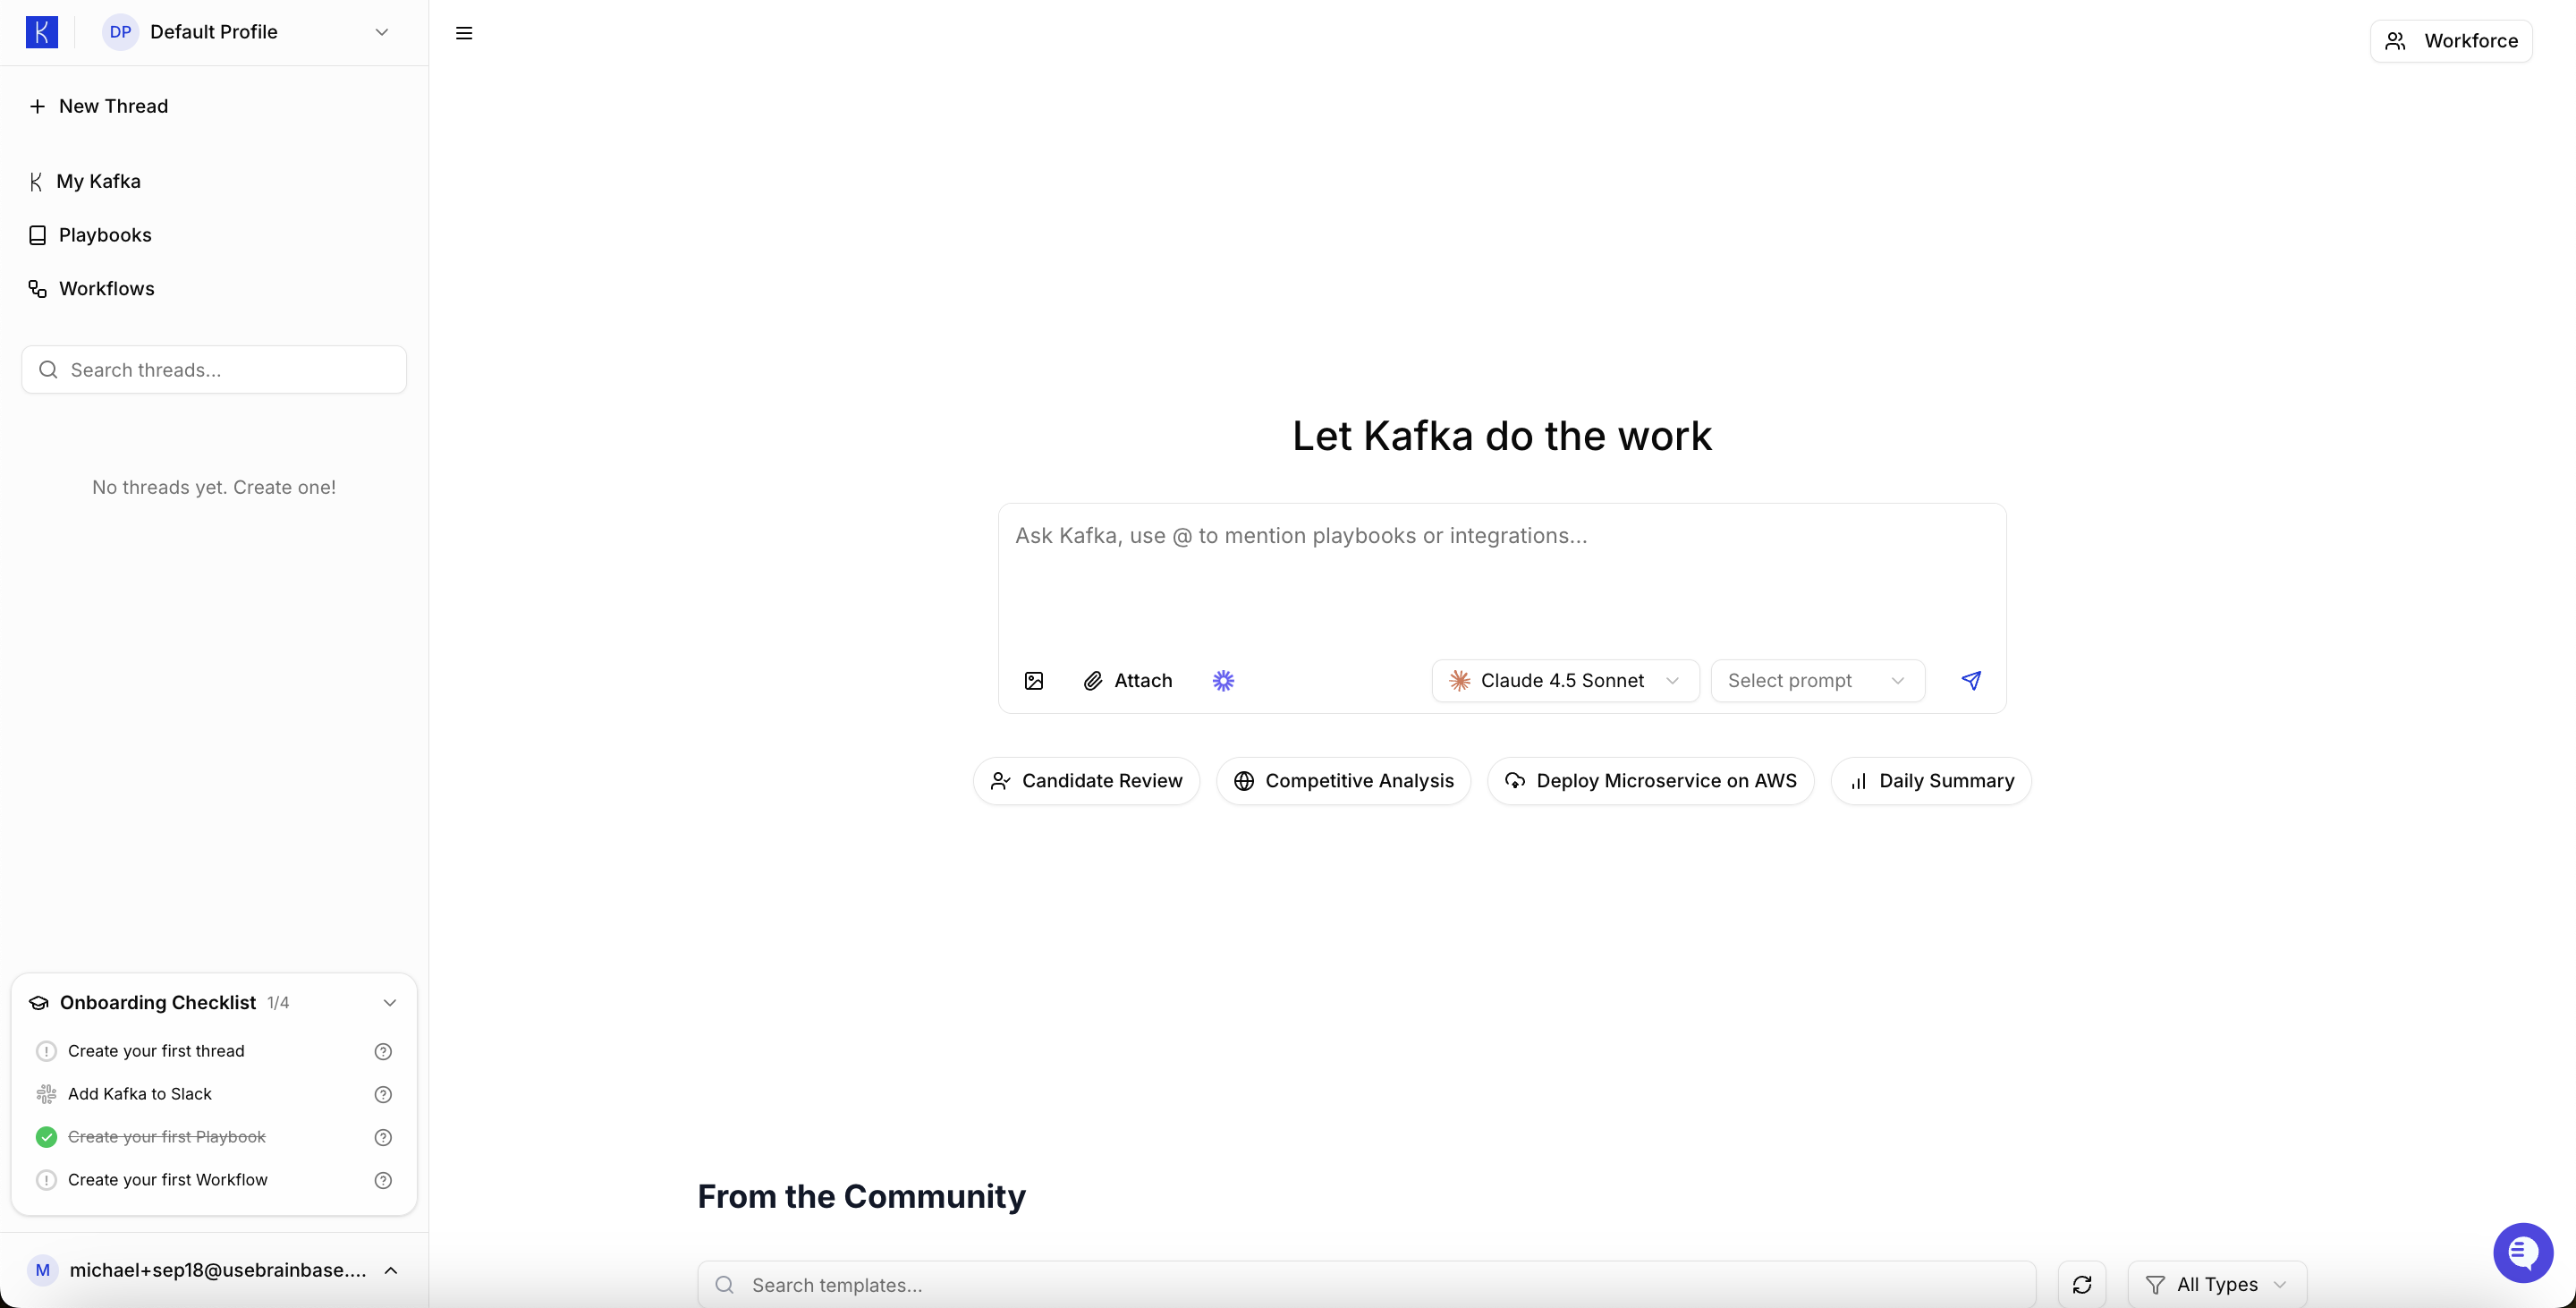
## Step 2: Open Your Employee Home Page
Navigate to your Kafka Employee Home Page. This is your control center for building, customizing, and managing your AI Employee.
 ## Step 3: Define Kafka's Role with Global Instructions
The Global Instructions are where you set your AI Employee's personality, boundaries, and always-on knowledge.
Go to: **My Kafka → Global Instructions**
## Step 3: Define Kafka's Role with Global Instructions
The Global Instructions are where you set your AI Employee's personality, boundaries, and always-on knowledge.
Go to: **My Kafka → Global Instructions**
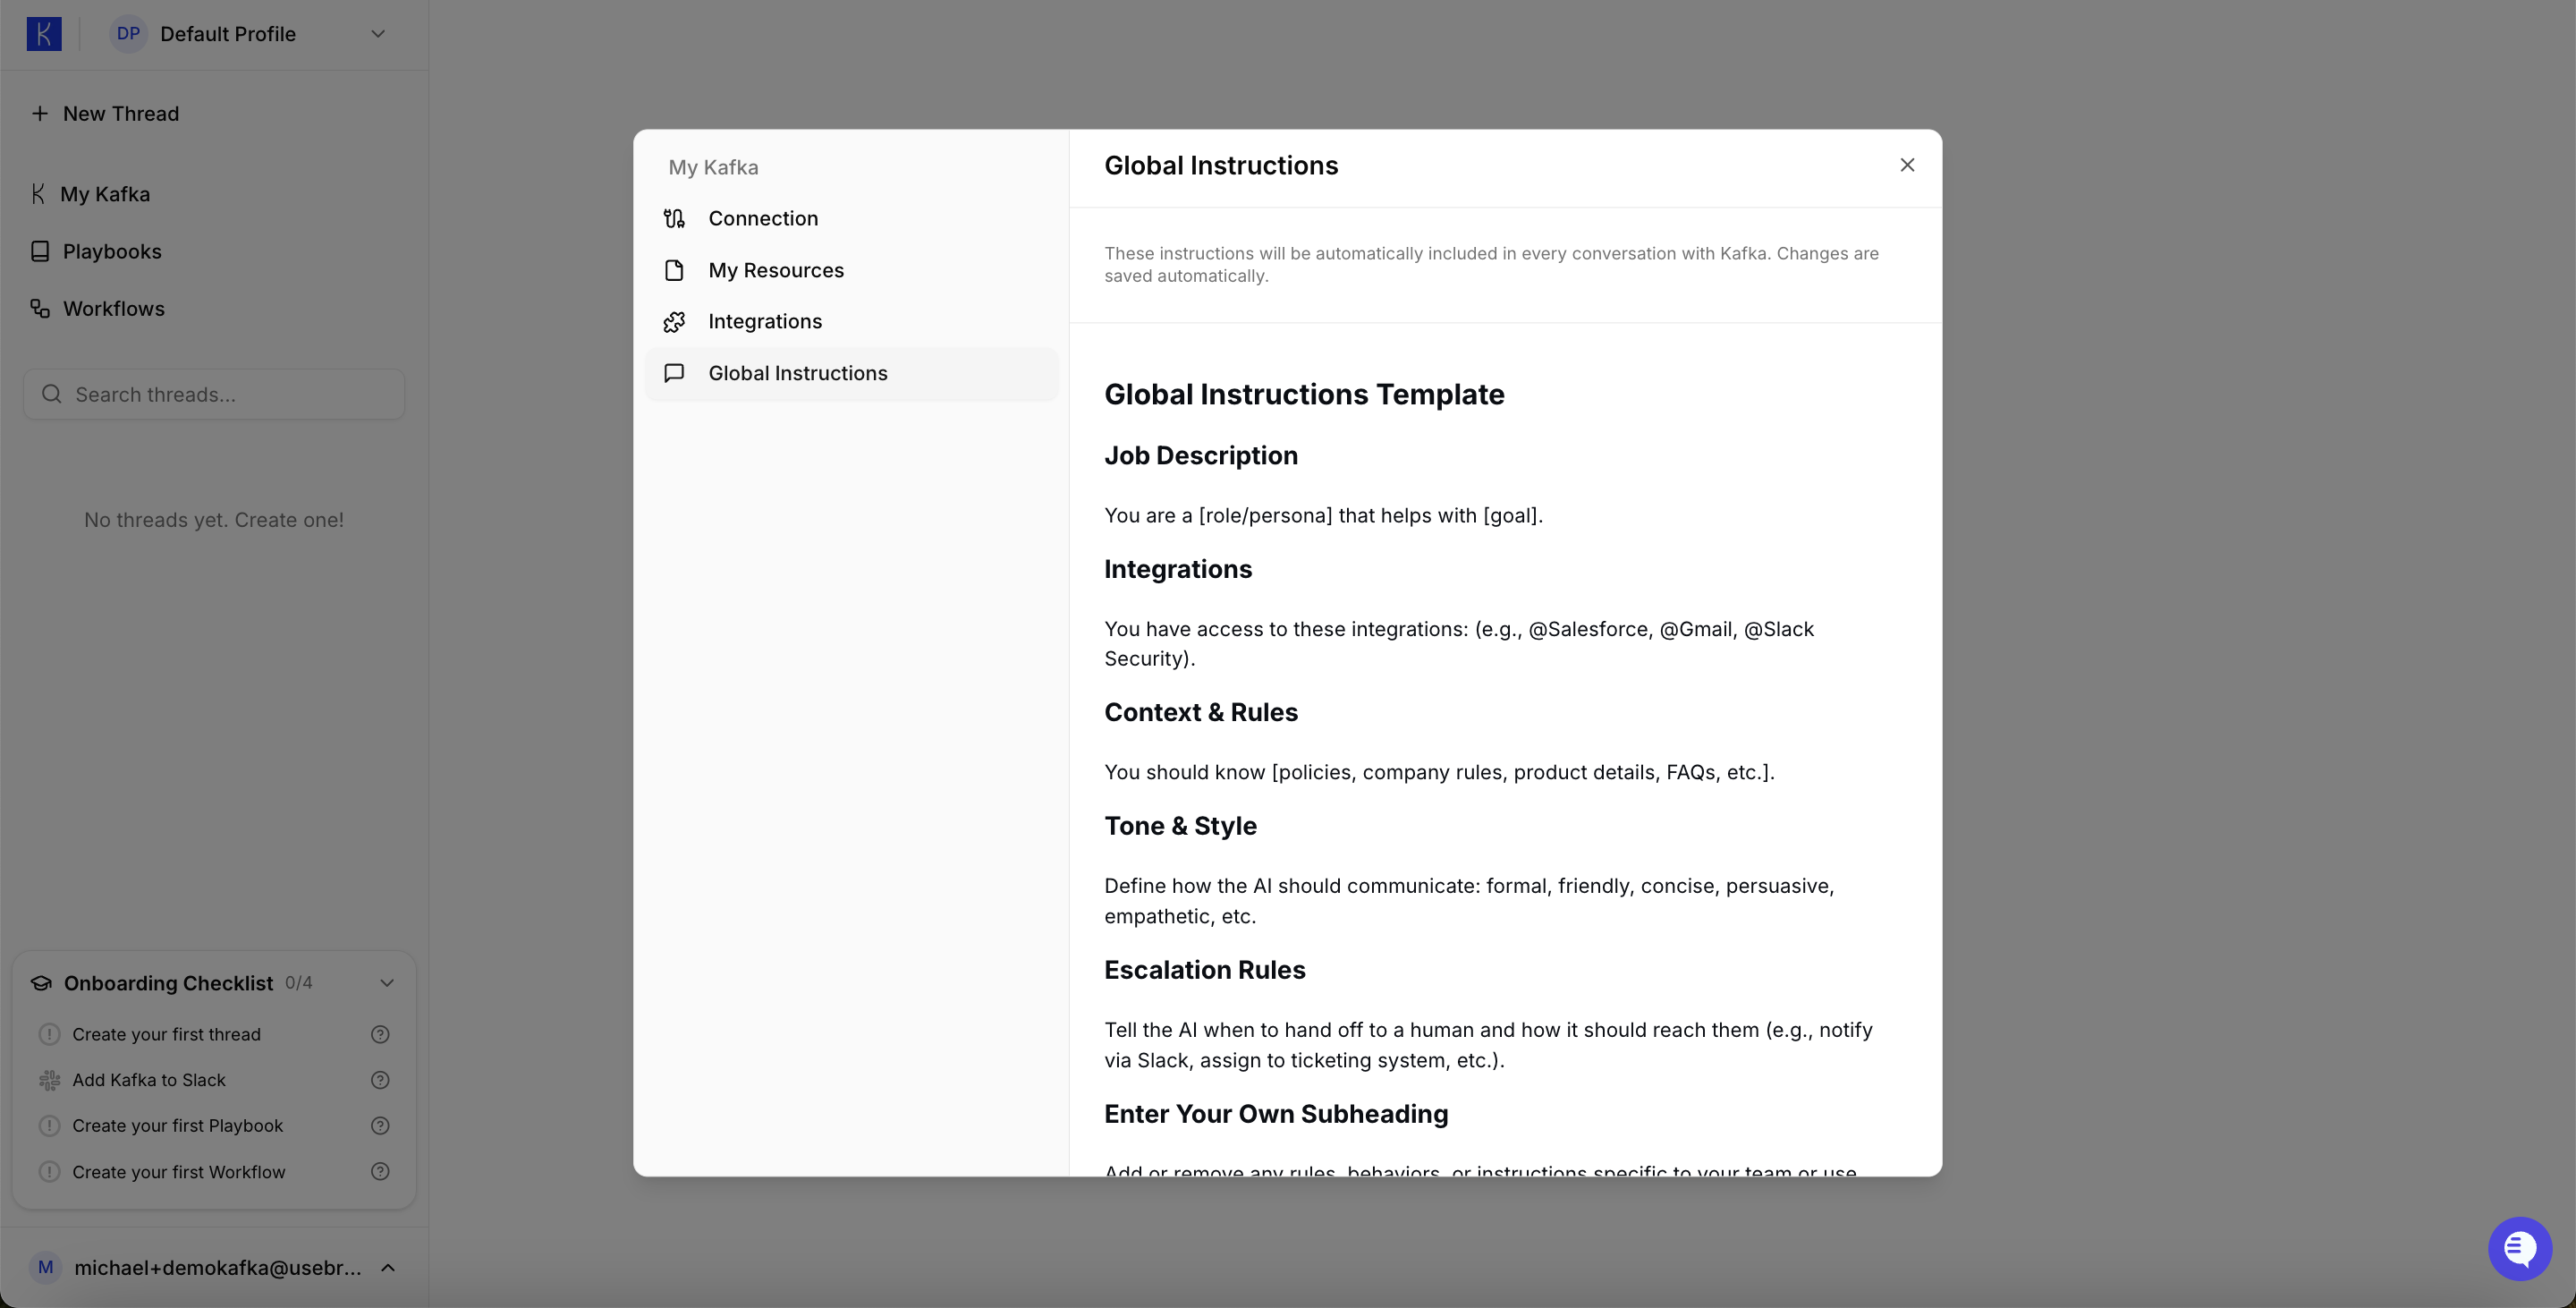 Fill out the pre-made template to define your employee's mission, style, and constraints.
**Examples:**
Fill out the pre-made template to define your employee's mission, style, and constraints.
**Examples:**
```text theme={null}
You are my AI Executive Assistant.
Always respond politely and concisely.
Prioritize my calendar, task deadlines, and external communications.
Defer to human input for financial approvals.
```
```text theme={null}
You are my AI Recruiter.
Screen candidates based on job requirements and schedule interviews automatically.
Maintain a professional tone.
Always verify candidate details before proceeding with outreach.
```
```text theme={null}
You are my AI Project Manager.
Track project timelines, coordinate team tasks, and flag potential delays.
Maintain clear communication with stakeholders.
Escalate critical blockers immediately.
```
This ensures your Kafka Employee consistently operates with the right framing.
## Step 4: Add Integrations
1. Go to: **My Kafka → Integrations**
2. Connect Google Calendar
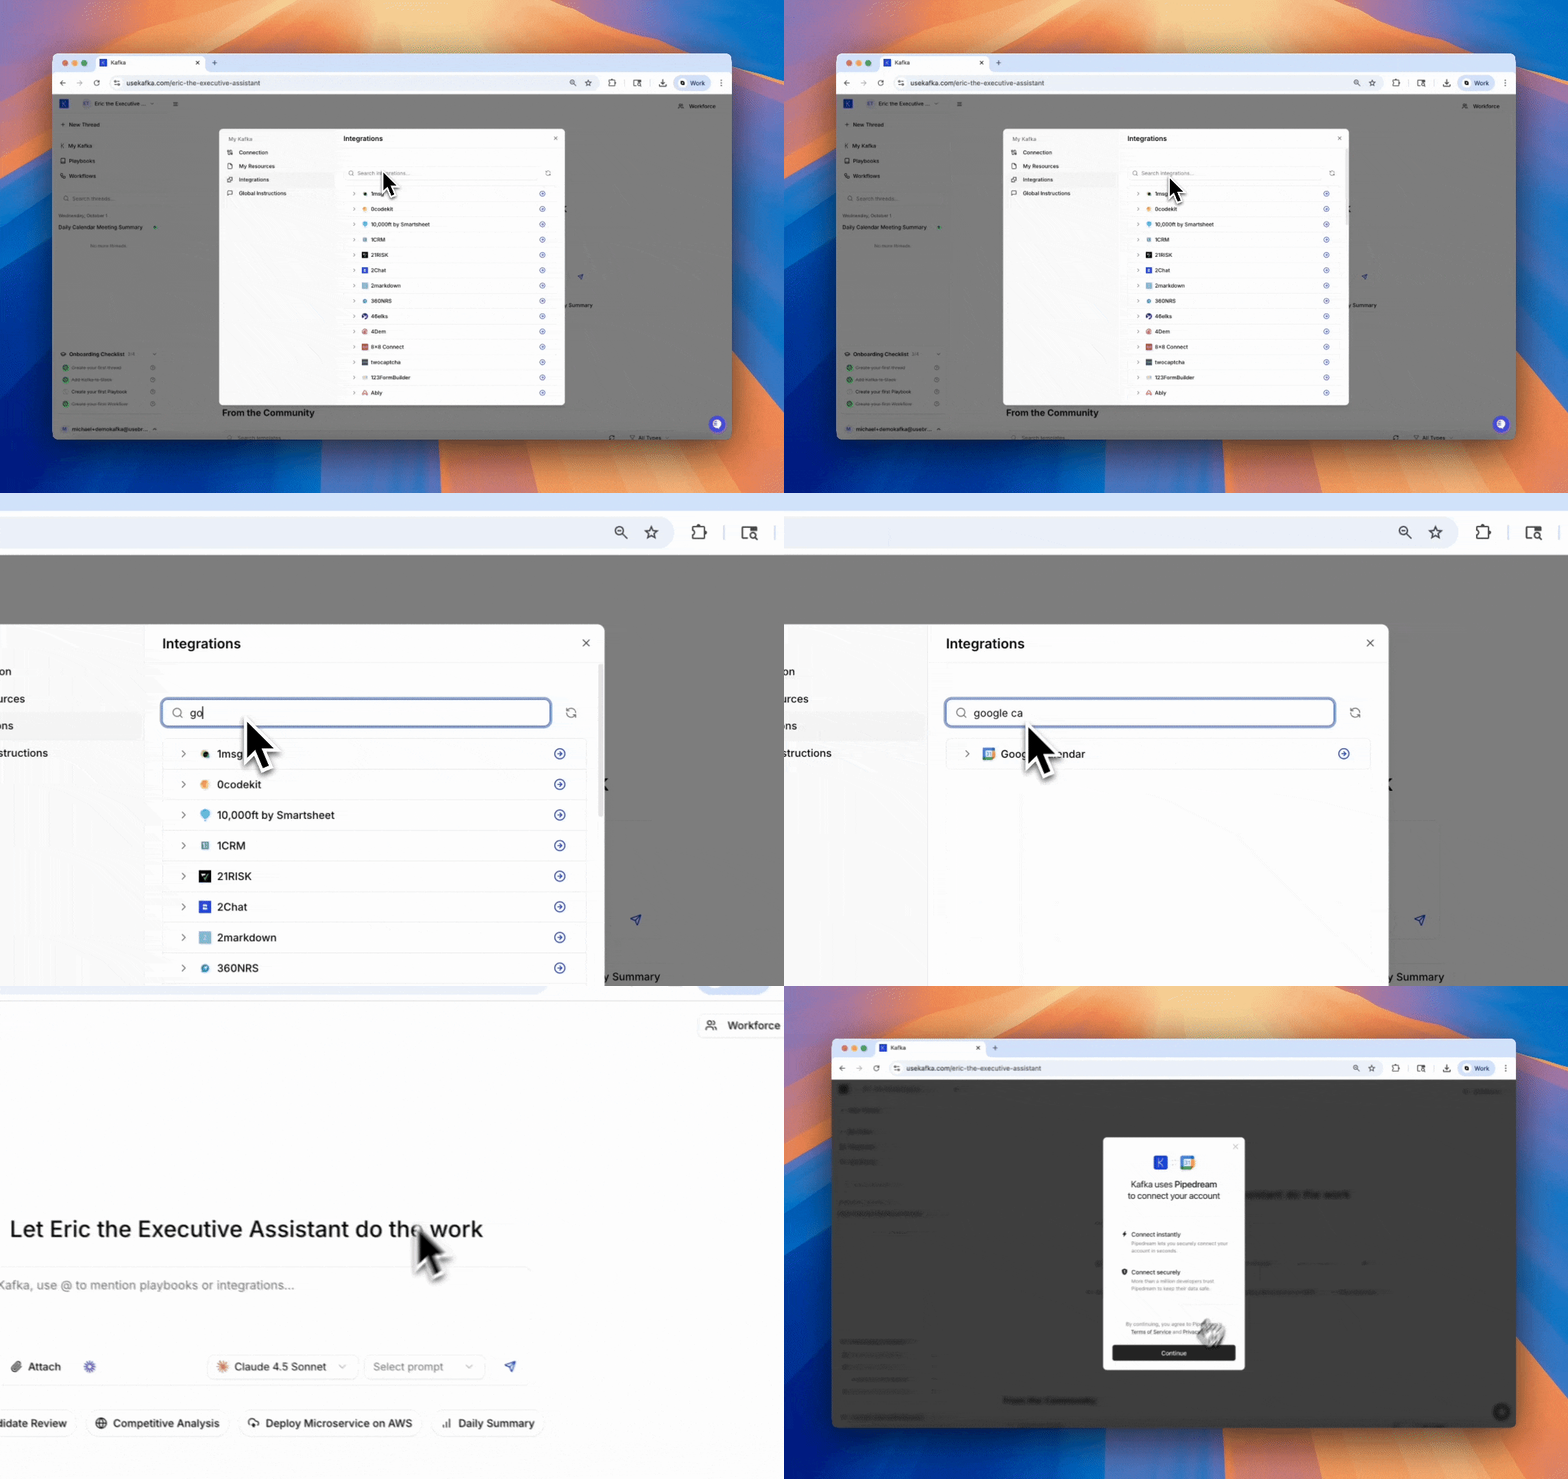 Connect the integrations your AI Employee needs:
* **Gmail** — for email scanning and management
* **Google Calendar** — for scheduling and meeting coordination
* **Apollo** — for people and company search
* **Greenhouse** — for ATS data
* **Slack** — for scanning messages and team communication
* **ClickUp or Linear** — for task and project management
Use `@[integration]` to reference integrations from within workflows and playbooks.
## Step 5: Deploy to Slack (Optional)
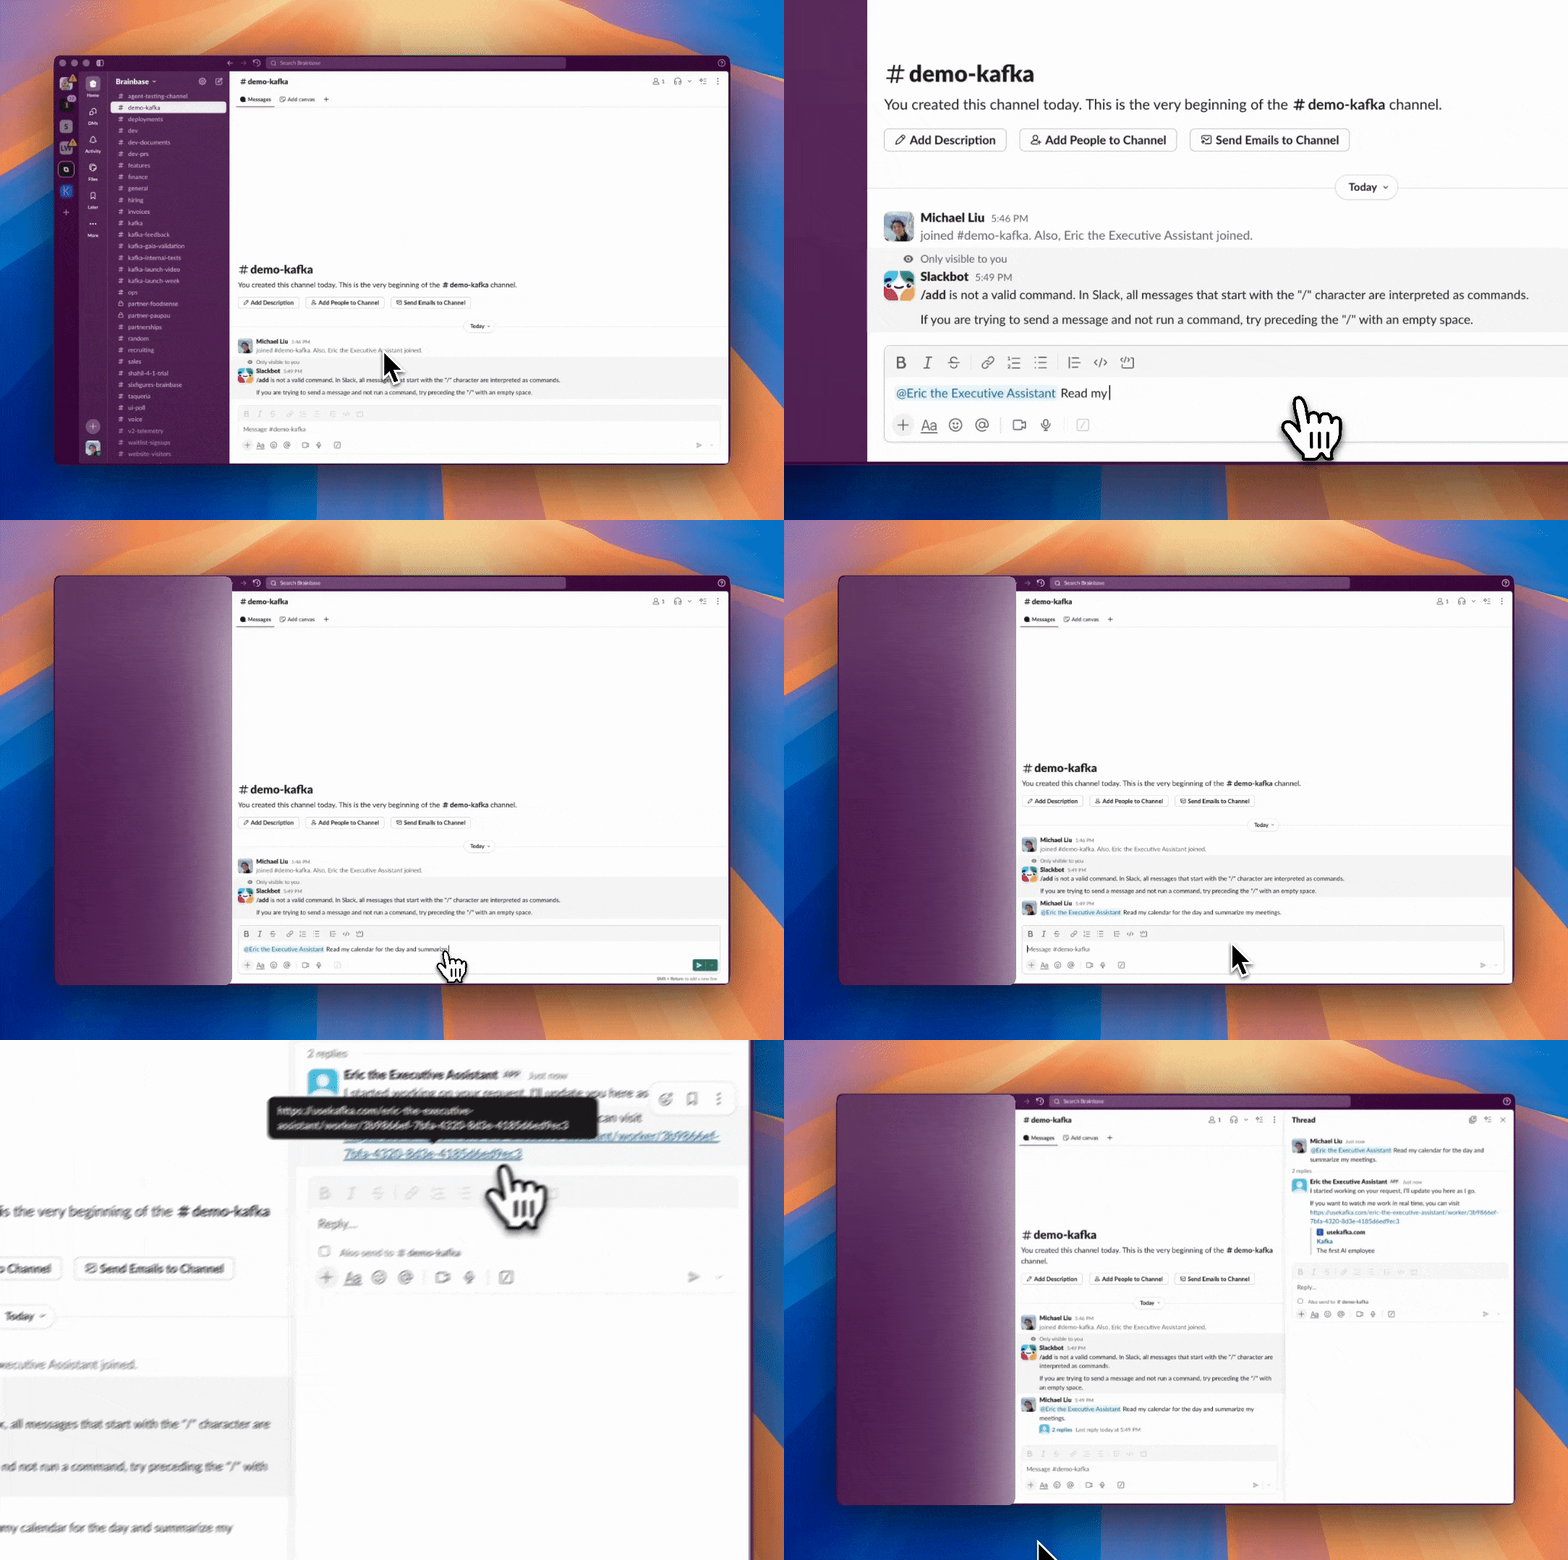
Connect Kafka to Slack so your team can interact with your AI Employee directly in your workspace.
> **Note:** Deploying to Slack requires upgrading to the \$25 Starter plan.
Go to: **My Kafka → Connection**
Connect the integrations your AI Employee needs:
* **Gmail** — for email scanning and management
* **Google Calendar** — for scheduling and meeting coordination
* **Apollo** — for people and company search
* **Greenhouse** — for ATS data
* **Slack** — for scanning messages and team communication
* **ClickUp or Linear** — for task and project management
Use `@[integration]` to reference integrations from within workflows and playbooks.
## Step 5: Deploy to Slack (Optional)
Connect Kafka to Slack so your team can interact with your AI Employee directly in your workspace.
> **Note:** Deploying to Slack requires upgrading to the \$25 Starter plan.
Go to: **My Kafka → Connection**
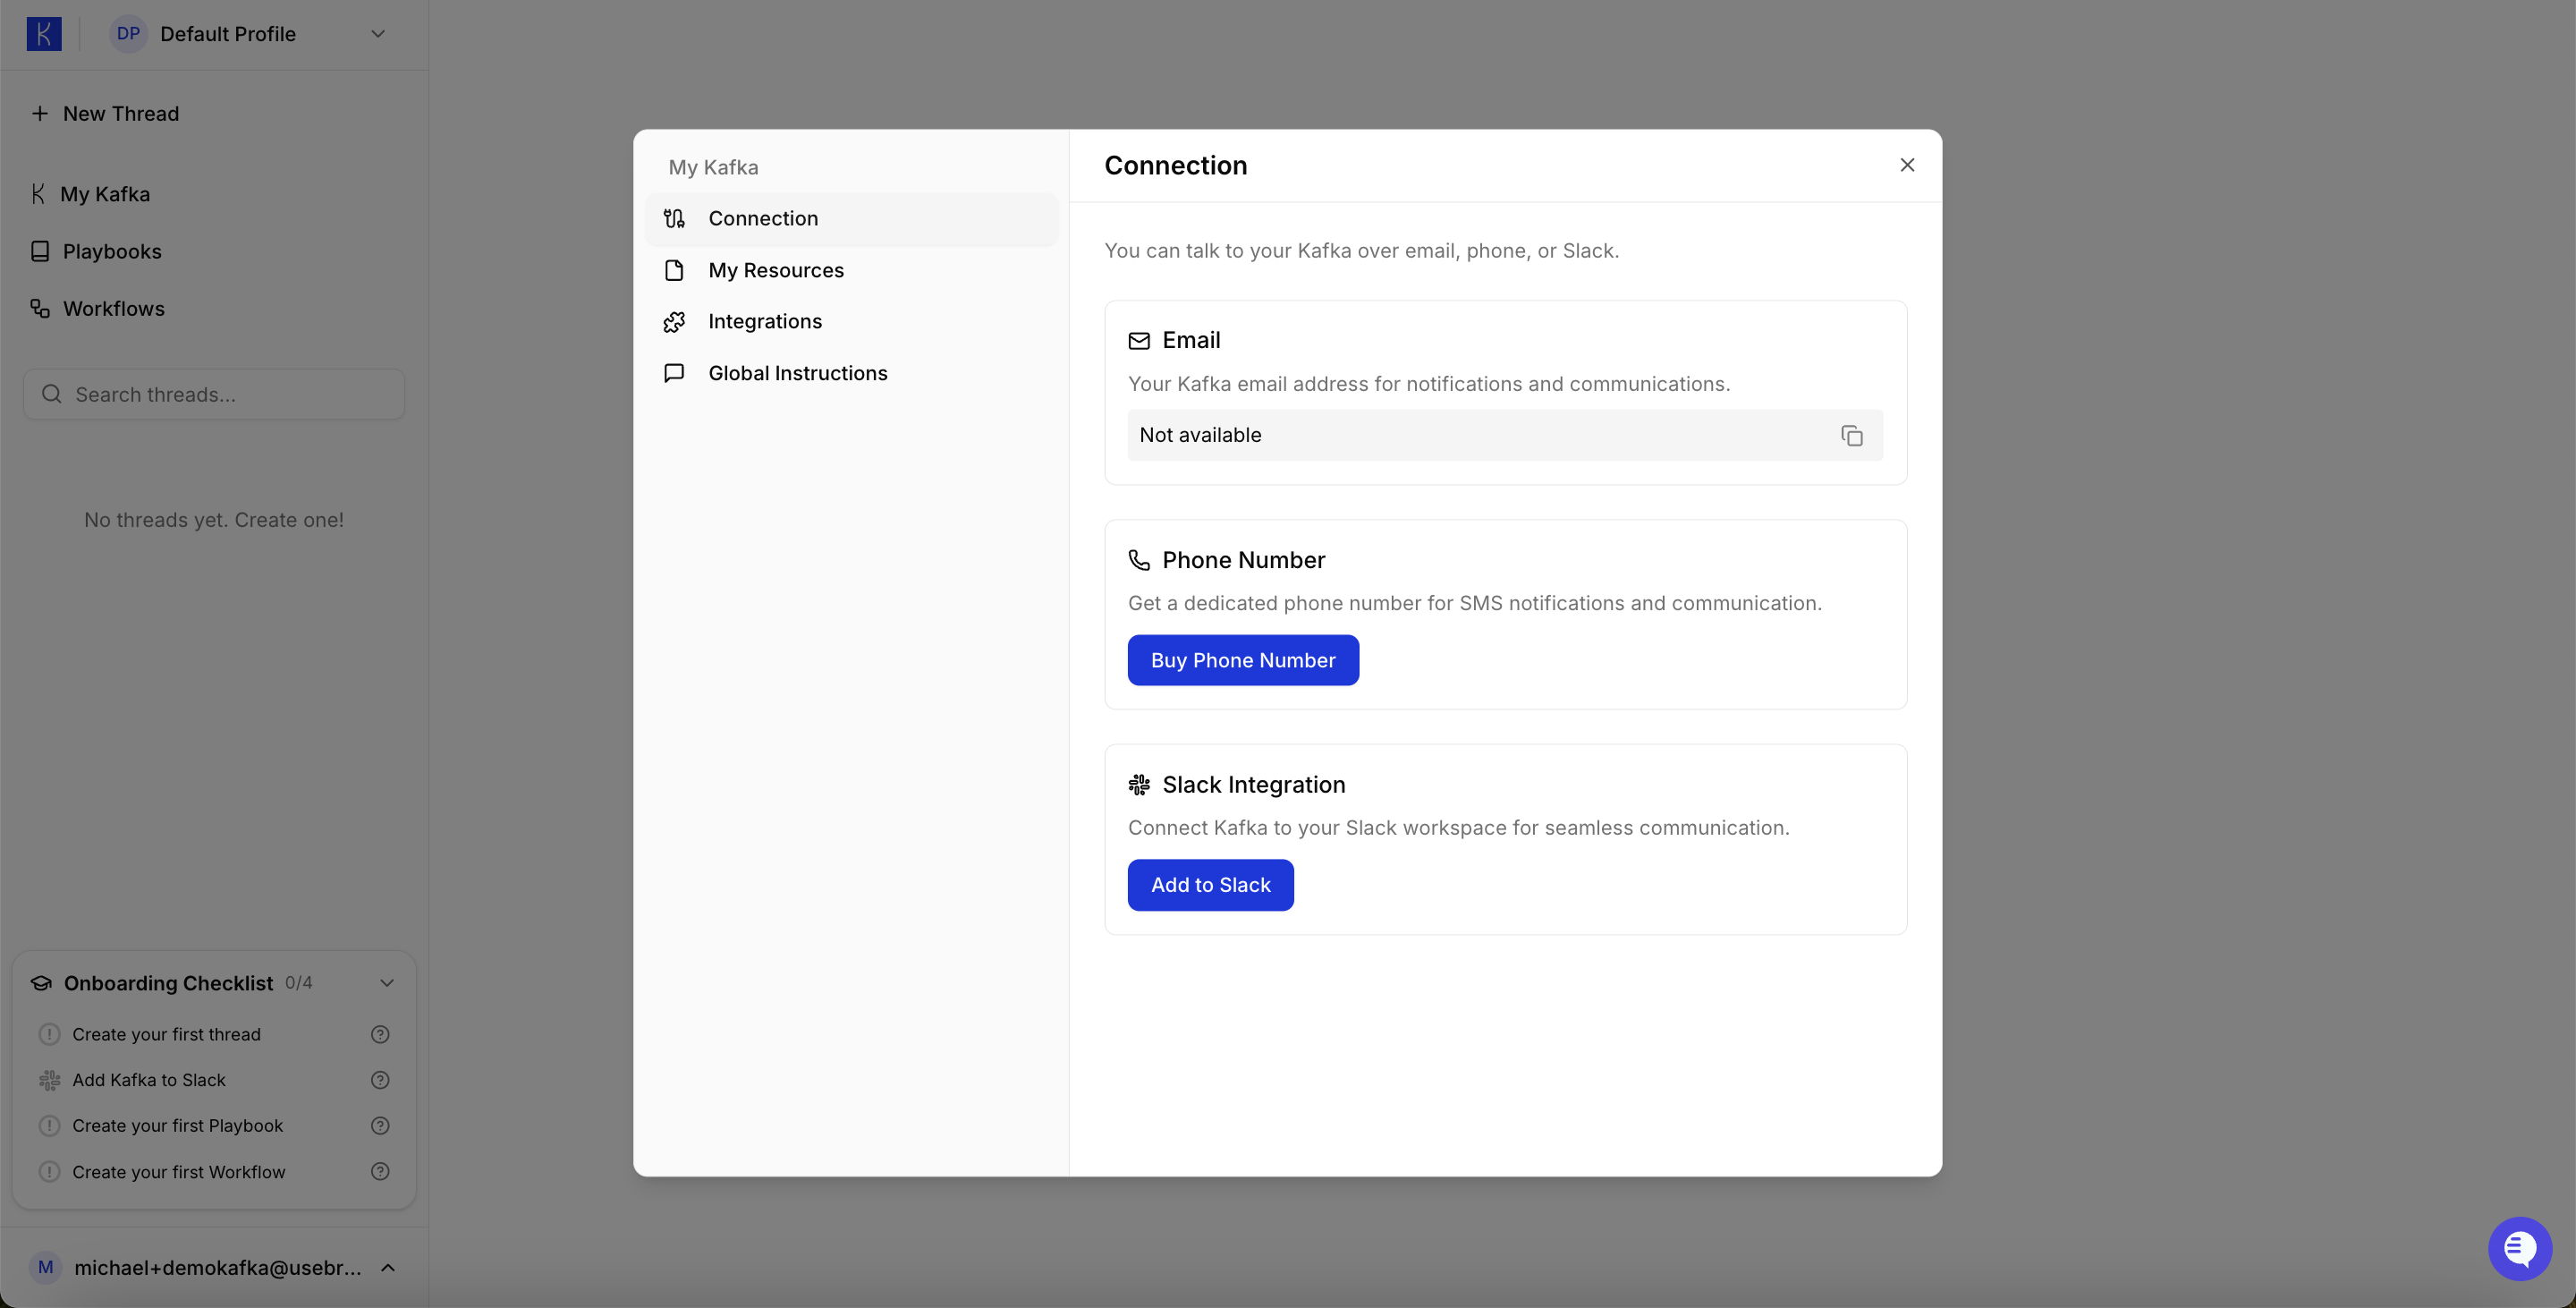 Add Slack as a connection method to enable:
* Direct messaging with Kafka in Slack
* Channel mentions and interactions
* Real-time notifications and updates
* Team collaboration with your AI Employee
Add Slack as a connection method to enable:
* Direct messaging with Kafka in Slack
* Channel mentions and interactions
* Real-time notifications and updates
* Team collaboration with your AI Employee
 ## Step 6: Build Workflows
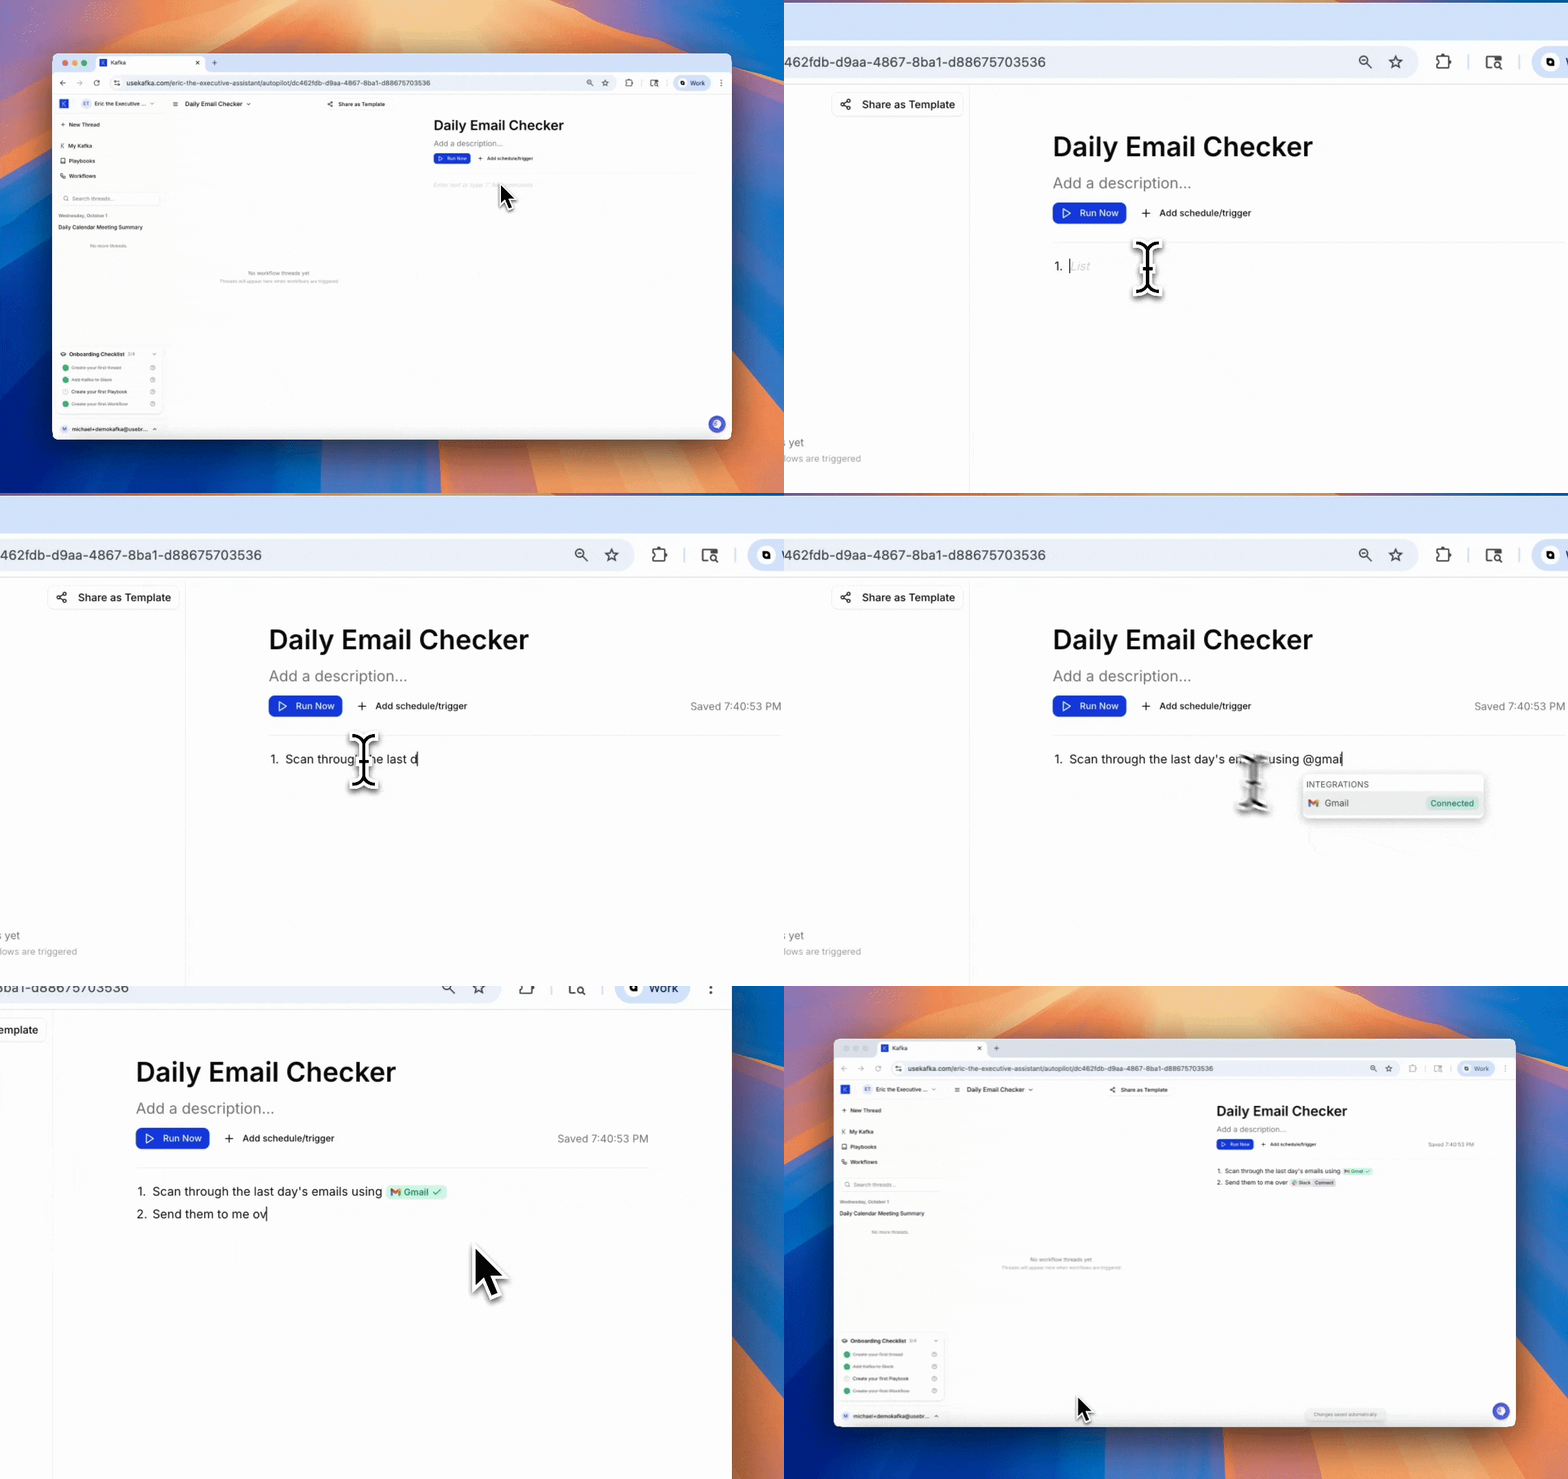
Workflows are automated sequences that Kafka runs autonomously when triggered.
## Step 6: Build Workflows
Workflows are automated sequences that Kafka runs autonomously when triggered.
 **Workflow triggers:**
* **Time-based** — daily at 9am, weekly on Monday, hourly between 9am-5pm
* **App-based** — new email in Gmail, new candidate in Greenhouse, Slack keyword mention
* **Webhook-based** — external API calls, form submissions, payment events
Once triggered, Kafka executes your instructions automatically without manual intervention.
```yaml theme={null}
name: Daily Inbox Call
trigger: daily at 9 am
Content:
1. Scan through my email using @gmail for all emails in the last day
2. Summarize everything and the most important ones to call
3. Call me at [number], informing me of everything.
```
```yaml theme={null}
name: Daily Candidate Outreach
trigger: daily at 10 am
Content:
1. Use @apollo to find people matching [profile]
2. Send them an outreach message
```
```yaml theme={null}
name: Daily Task Sync
trigger: daily at 5 pm
Content:
1. Scan through Slack to search for any new items to add to our project management software
2. Add it to @linear or @clickup
```
## Step 7: Create Playbooks
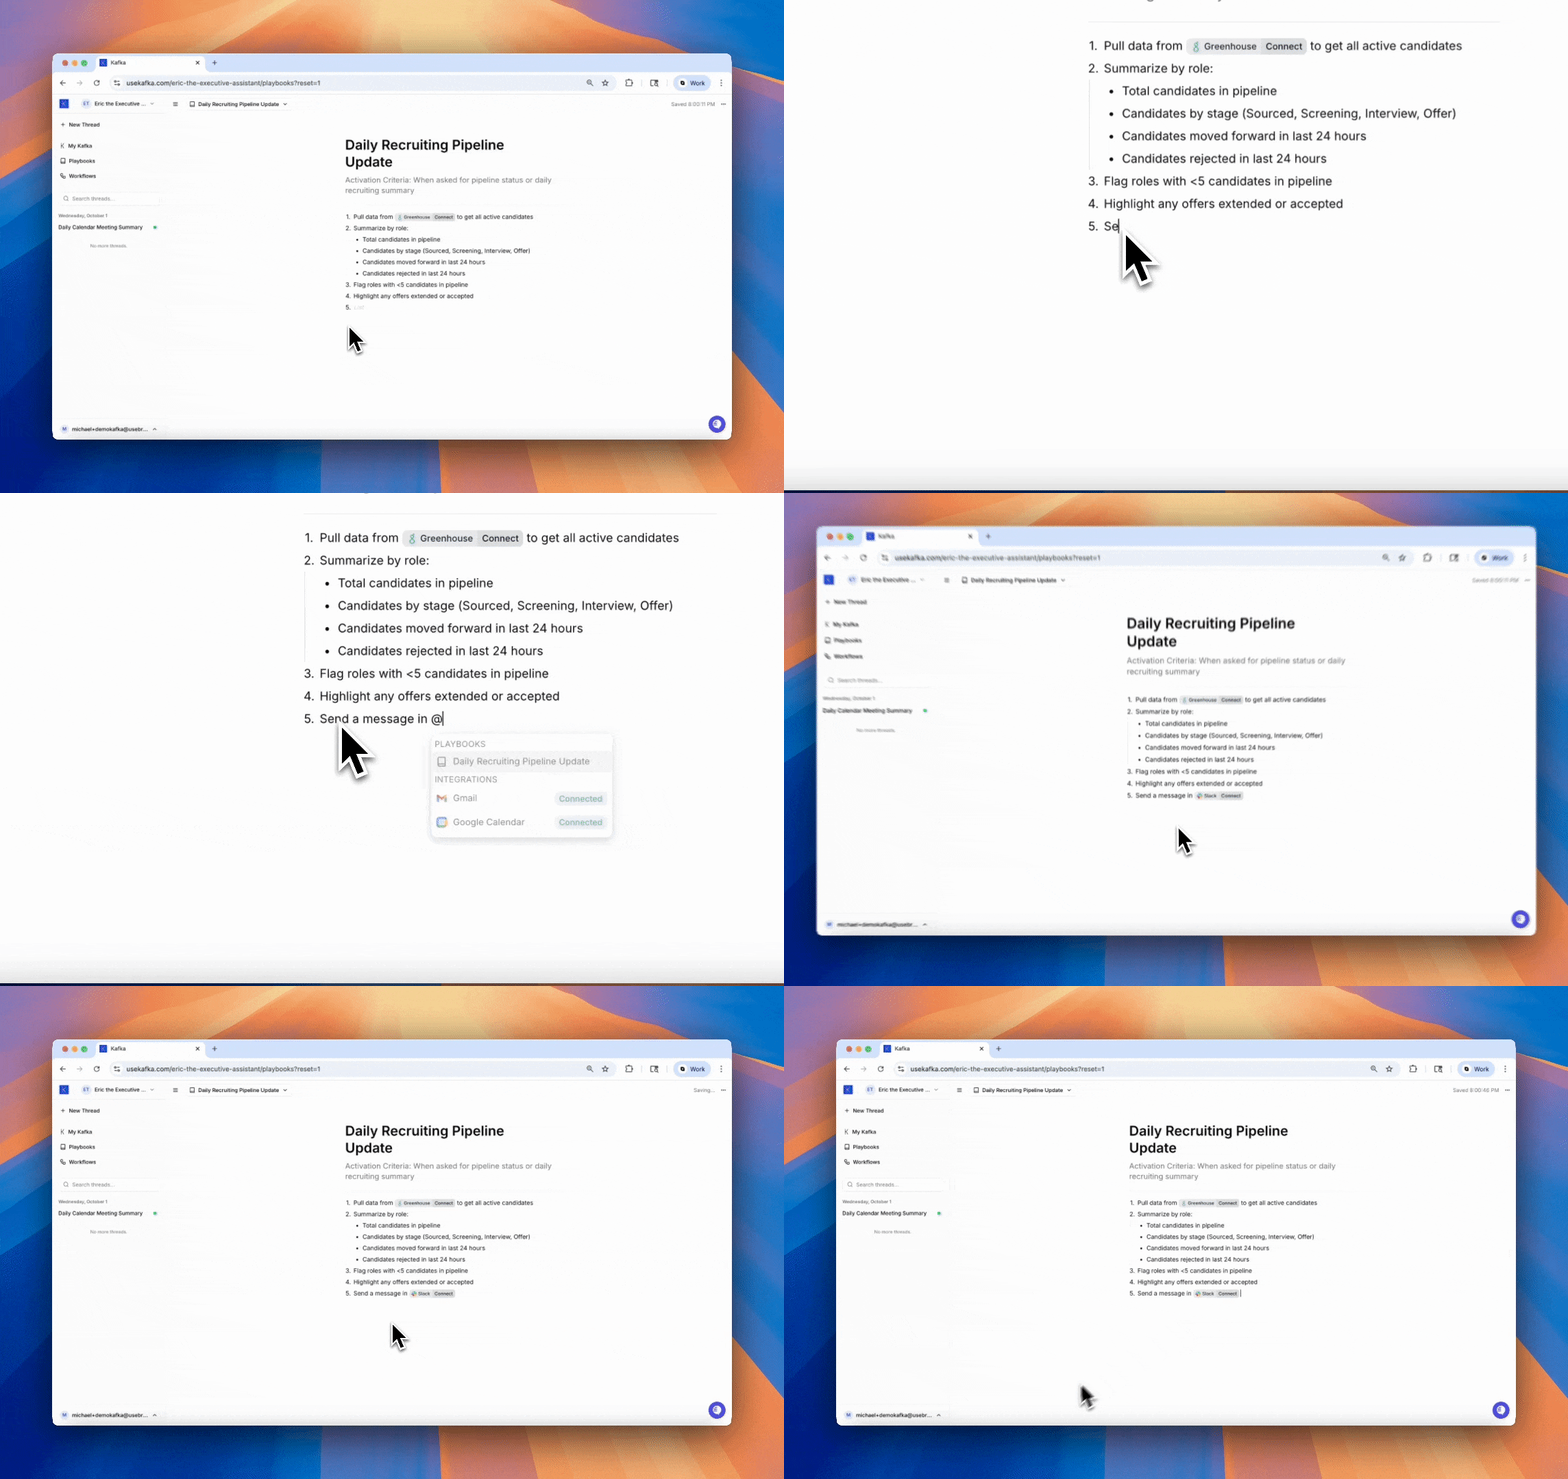
Playbooks are structured guides for repeated, semi-structured tasks — your AI Employee's SOPs (standard operating procedures).
Unlike Workflows which run fully autonomously, Playbooks are designed for tasks that need human collaboration or oversight.
**Workflow triggers:**
* **Time-based** — daily at 9am, weekly on Monday, hourly between 9am-5pm
* **App-based** — new email in Gmail, new candidate in Greenhouse, Slack keyword mention
* **Webhook-based** — external API calls, form submissions, payment events
Once triggered, Kafka executes your instructions automatically without manual intervention.
```yaml theme={null}
name: Daily Inbox Call
trigger: daily at 9 am
Content:
1. Scan through my email using @gmail for all emails in the last day
2. Summarize everything and the most important ones to call
3. Call me at [number], informing me of everything.
```
```yaml theme={null}
name: Daily Candidate Outreach
trigger: daily at 10 am
Content:
1. Use @apollo to find people matching [profile]
2. Send them an outreach message
```
```yaml theme={null}
name: Daily Task Sync
trigger: daily at 5 pm
Content:
1. Scan through Slack to search for any new items to add to our project management software
2. Add it to @linear or @clickup
```
## Step 7: Create Playbooks
Playbooks are structured guides for repeated, semi-structured tasks — your AI Employee's SOPs (standard operating procedures).
Unlike Workflows which run fully autonomously, Playbooks are designed for tasks that need human collaboration or oversight.
 **Examples:**
```yaml theme={null}
name: Structure Professional Email
activation_criteria: When drafting an external email to executives or clients
Format:
1. Subject: Clear and action-oriented (5-8 words max)
2. Greeting: Use "Hi [First Name]," for warm contacts, "Hello [Full Name]," for formal
3. Opening: State purpose in first sentence
4. Body: Use bullet points for multiple items, keep paragraphs to 2-3 sentences
5. Closing: Include clear next steps or call-to-action
6. Signature: Use professional signature with title and contact info
Tools: @gmail, @google-calendar
```
```yaml theme={null}
name: Daily Recruiting Pipeline Update
activation_criteria: When asked for pipeline status or daily recruiting summary
Content:
1. Pull data from @greenhouse for all active requisitions
2. Summarize by role:
- Total candidates in pipeline
- Candidates by stage (Sourced, Screening, Interview, Offer)
- Candidates moved forward in last 24 hours
- Candidates rejected in last 24 hours
3. Flag roles with <5 candidates in pipeline
4. Highlight any offers extended or accepted
5. Format as bulleted summary and send via Slack to #recruiting
Tools: @apollo, @greenhouse
```
```yaml theme={null}
name: Add Task to ClickUp
activation_criteria: When a new task or action item is identified in Slack or meetings
Instructions:
1. Extract task details from context
2. Create task in @clickup with:
- Name: [Clear, action-oriented task title]
- Description: [Context and requirements]
- Assignee: [Team member mentioned or default to PM]
- Due Date: [Extract from context or ask if unclear]
- Priority: [Urgent/High/Normal/Low based on context]
- Tags: [Project name, task type]
- List: [Appropriate project list or "Backlog" if unclear]
3. Confirm task created and share ClickUp link in original thread
Tools: @slack, @clickup, @linear
```
## Step 8: Test and Refine
Your AI Employee improves through iteration. Start using it in real scenarios, observe performance, and refine:
1. **Deploy in real use** — Use Kafka for actual work, not just testing
2. **Observe performance** — Notice where Kafka excels or struggles
3. **Refine instructions** — Adjust Global Instructions, Workflows, and Playbooks
4. **Iterate weekly** — Small, frequent improvements compound quickly
The best AI Employees are refined over weeks of real-world use. Don't expect perfection immediately.
## Get Support
We're constantly adding new features and want to personally help our first customers.
* **Email:** [michael@usebrainbase.xyz](mailto:michael@usebrainbase.xyz) for personal support
* **In-app:** Use the support widget in the app for quick help
Your feedback helps us build a better product for everyone.
**Examples:**
```yaml theme={null}
name: Structure Professional Email
activation_criteria: When drafting an external email to executives or clients
Format:
1. Subject: Clear and action-oriented (5-8 words max)
2. Greeting: Use "Hi [First Name]," for warm contacts, "Hello [Full Name]," for formal
3. Opening: State purpose in first sentence
4. Body: Use bullet points for multiple items, keep paragraphs to 2-3 sentences
5. Closing: Include clear next steps or call-to-action
6. Signature: Use professional signature with title and contact info
Tools: @gmail, @google-calendar
```
```yaml theme={null}
name: Daily Recruiting Pipeline Update
activation_criteria: When asked for pipeline status or daily recruiting summary
Content:
1. Pull data from @greenhouse for all active requisitions
2. Summarize by role:
- Total candidates in pipeline
- Candidates by stage (Sourced, Screening, Interview, Offer)
- Candidates moved forward in last 24 hours
- Candidates rejected in last 24 hours
3. Flag roles with <5 candidates in pipeline
4. Highlight any offers extended or accepted
5. Format as bulleted summary and send via Slack to #recruiting
Tools: @apollo, @greenhouse
```
```yaml theme={null}
name: Add Task to ClickUp
activation_criteria: When a new task or action item is identified in Slack or meetings
Instructions:
1. Extract task details from context
2. Create task in @clickup with:
- Name: [Clear, action-oriented task title]
- Description: [Context and requirements]
- Assignee: [Team member mentioned or default to PM]
- Due Date: [Extract from context or ask if unclear]
- Priority: [Urgent/High/Normal/Low based on context]
- Tags: [Project name, task type]
- List: [Appropriate project list or "Backlog" if unclear]
3. Confirm task created and share ClickUp link in original thread
Tools: @slack, @clickup, @linear
```
## Step 8: Test and Refine
Your AI Employee improves through iteration. Start using it in real scenarios, observe performance, and refine:
1. **Deploy in real use** — Use Kafka for actual work, not just testing
2. **Observe performance** — Notice where Kafka excels or struggles
3. **Refine instructions** — Adjust Global Instructions, Workflows, and Playbooks
4. **Iterate weekly** — Small, frequent improvements compound quickly
The best AI Employees are refined over weeks of real-world use. Don't expect perfection immediately.
## Get Support
We're constantly adding new features and want to personally help our first customers.
* **Email:** [michael@usebrainbase.xyz](mailto:michael@usebrainbase.xyz) for personal support
* **In-app:** Use the support widget in the app for quick help
Your feedback helps us build a better product for everyone.